There are multiple ways that you can setup your 3CX on your mobile device which will provide you with full access to all functionality of your hosted phone system. Please see below for the 2 methods you can use to provision your extension to your device:
Method 1 – provisioning via your ‘QR’ code:
1. In order to provision your 3CX account using your QR code, you must first ensure that you have downloaded and installed the ‘3CX’ app from your applicable Apple or Google Play store. Please ensure you complete this before continuing.
App store links:
Apple devices – https://apps.apple.com/au/app/3cx/id992045982
Android devices – https://play.google.com/store/apps/details?id=com.tcx.sipphone14
(please note, you must download ‘3CX’ and not ‘3CX WebMeeting)
2. Once you have downloaded and installed the application, tap on it to open
3. You might be prompted to allow the application to access your microphone, send you notifications and for access to the camera (this is required for QR code provisioning). Please choose the ‘Allow’ and ‘OK’ options if these prompts appear. The app will also request read-only access to the contacts on your mobile device but you can deny this If required
4. You will now be requested to ‘Scan QR Code’. Select this option and the your device camera will open

5. To get your QR code, you will have login details to your account, which are available in the ‘3CX Welcome email’ you had received previously (speak with our team if you no longer have access to this and we can resend them)
6. You will need to login to your 3CX web portal by clicking on the web portal link in the 3CX welcome email (choose the ‘outside’ link)
7. Use your login username and password as they appear in the email
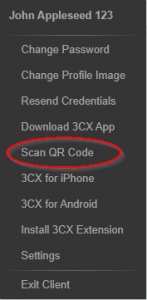
8. Once you have logged into the portal, please click on your ‘avatar’ which is the profile picture in the top right-hand corner

9. A drop down menu will appear where will you will need to click on ‘Scan QR Code’
10. The QR Code window will appear with your specific QR code
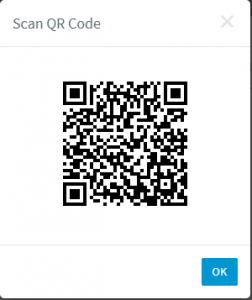
11. On your mobile device, please open the 3CX app if it is not already open and select the option to ‘Scan QR Code’
12. Point your device camera at the code and give the application about 10-15 seconds to setup your extension
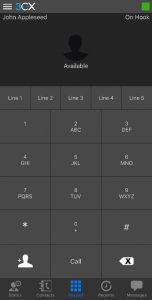
13. You will know that your extension is setup successfully when your name appears in the top left-hand corner of the app and the right hand side advises ‘On Hook’
14. If you experience any errors with provisioning of your extension using this method, please see below for instructions on how you can manually setup your extension or give our Service Desk team a call.
Method 2 – provisioning via your configuration file:
1. In order to provision your 3CX account using your QR code, you must first ensure that you have downloaded and installed the ‘3CX’ app from your applicable Apple or Google Play store. Please ensure you complete this before continuing.
App store links:
Apple devices – https://apps.apple.com/au/app/3cx/id992045982
Android devices – https://play.google.com/store/apps/details?id=com.tcx.sipphone14
(please note, you must download ‘3CX’ and not ‘3CX WebMeeting’)
2. Once you have downloaded and installed the application, tap on it to open
3. You might be prompted to allow the application to access your microphone and to send you notifications. Please choose the ‘Allow’ and ‘OK’ options if these prompts appear. The app will also request read-only access to the contacts on your mobile device but you can deny this if required.
4. In order to provision your 3CX account manually, you must have the ability to access your 3CX welcome email from your mobile device. If you do not have your work emails configured, you may need to send the welcome email to another account that you have access to on your device
5. In your default email app on your device (iOS Mail, Android Mail or Outlook) please locate your 3CX Welcome email and find your ‘3cxconfig’ file attached
6. Tap on the attachment to ‘download’ it to your mobile device
7. Upon tapping the attachment, your app will ask you want you want to do with the device
-
Apple users
- i. After tapping the attachment, an options menu will appear with a list of icons you can scroll through. Please scroll to the very right-hand side and select the ‘More’ button
- ii. Scroll down, and then select the option to ‘Copy to 3CX’
- iii. The 3CX app will automatically launch and configure your extension
Android users
- i. After tapping on the attachment, the 3CX app should launch automatically and ask you if you would like to provision the extension
- ii. Allow the extension to be provisioned and this will setup automatically
8. You will know that your extension is setup successfully when your name appears in the top left-hand corner of the app and the right hand side advises ‘On Hook’
